I've started using ngrok a lot lately (I know, I know, late to the party). But then last week, Homebrew has updated it to a version where it wants some $25 to supply custom domain names. I mean, I could pay that, but I'm paying Hetzner like $8 or $9 for a server, and then I'm paying for my domain and… it's still cheaper?
I understand that hosting is more commoditized than tunnels — I guess the market is wider — but still, it felt like I could spend a few hours and get something similar working. Why do I need custom domains? Because losing cookies makes me unhappy, and cookies require domain not to change. Plus, testing OAuth is really painful without custom domain since everybody wants to pin redirect URL to a stable domain.
There are many open source alternatives, the one I really liked is called SirTunnel. It's a small script which uses Caddy's JSON API to add and remove domains. But it got me thinking: why add and remove domains when I can just give another domain for some site forever? So if I started that site's process, it's working, and when not — well, you'll get 502 Gateway Timeout on that particular domain, no big deal.
The Plan
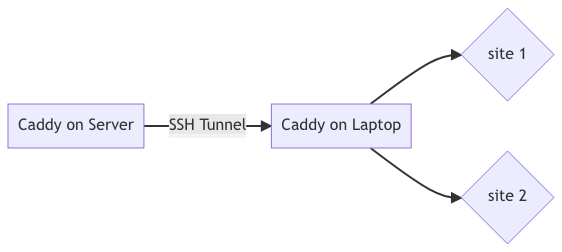
It's simple! I create a wildcard domain (something like *.xxx.solovyov.net, xxx is for "real domain is none of your business" 😁), and then reverse-proxy everything through an SSH tunnel from a server to my laptop.
I'm still going to use Caddy since automatic HTTPS and laconic config appeals to me. 👍
Why do I need a local Caddy? Because SSH can proxy only single port and local processes occur on different ports. You can ignore that part if you don't need an ability to run multiple sites simultaneously. You know what, this case makes everything easier, since you require only one external domain for that rather than my wildcard setup.
Execution
So, I've got a local Caddy working with many domains mapped to various ports. My plan is to run every project on a separate port, so when I start a process, it's immediately available to the world. Feels a bit exhibitionist, but very convenient. ☺️
Next was permanent SSH tunnel. I could've done that myself, but I just found a recipe.
The first problem is that handling *.xxx.solovyov.net in Server-Caddy makes Caddy request a wildcard certificate. And this requires integration of Caddy with DNS provider, which is limited to a few big providers. So, I opted to just repeating site definitions. :)
Next problem was… that it all worked! I could not believe my eyes. 🤣
But the story does not end here. You know what is irritating about ngrok? Latency. Especially when you're on a bad connection.
I mean my site is right here on my laptop but those roundtrips just to test OAuth and what not… Argh. I did not invent anything better than just writing that development domain in /etc/hosts. And. It. Worked! Too bad /etc/hosts does not support wildcards, so I'll have to repeat domains there too.
Tutorial
You'll need a domain name you own and control (really, control matters more than ownership here 😜) and a VPS somewhere in the world. Please do not copy and paste stuff blindly, you'll have to change at least the domain name for this to work. :)
Domain
Add *.xxx entry of type A to your domain pointing at your VPS.
Local Caddy
brew install caddy — correct for your package manager — and start with this Caddyfile:
{
	auto_https disable_redirects # so remote caddy is happy
	email your@real.email # so you can debug problems with certs
}

(local) {
	{args.0}.xxx.solovyov.net {args.0}.xxx.solovyov.net:80 {
		encode zstd gzip
		reverse_proxy localhost:{args.1}

		handle_errors {
			respond "Local: {http.error.status_code} {http.error.status_text}"
		}

		log {
			level DEBUG
			output file /opt/homebrew/var/log/caddy/{args.0}.log
		}
	}
}

import local dev 5000
import local experiment 5001
import local blog 5002
This (local) thingie is called a snippet. Now I can just copy this import line as many times as I want, not having to repeat those lines.
We instruct Caddy to listen to port 80 so that basic HTTP works. We need HTTP since our SSH tunnel targets this port. But HTTPS (domain without :80) is also nice to have — it makes external and internal setup more similar.
brew services start caddy or equivalent to make Caddy run after system startup.
Persistent SSH Tunnel
Just follow a tutorial from Tyler, should be simple enough. Your /.ssh/config entry should look like this:
Host sshtun
	HostName your.remote.server
	RemoteForward 6800 127.0.0.1:80
    ServerAliveInterval 60
What Tyler doesn't tell is that you have launchctl load -w Library/LaunchAgents/your.plist.name.plist, this little -w marks it enabled so launchctl will start it after restart (sounds like a common theme ain't it?).
In case you're not on macOS, use your system's process manager or look at autossh.
Obviously, you can replace that part with some VPN solution, like Wireguard for an open-source solution or Tailscale like something more convenient.
Remote Caddy
No need to disable automatic redirects, so minimal version will look like this:
{
    email alexander@solovyov.net
}

(sshtun) {
    {args.0}.xxx.solovyov.net {
        encode zstd gzip
        reverse_proxy localhost:6800

		handle_errors {
			respond "Remote: {http.error.status_code} {http.error.status_text}"
		}

        log {
            output file /var/log/caddy/sshtun.log
        }
    }
}

import sshtun test
import sshtun experiment
import sshtun blog
You can see I'm using snippets here as well, but the port is the same every time, since this is our SSH tunnel.
Remote Caddy Wildcard
After some thinking, I decided to try out wildcard setup anyway. I moved my domain to Cloudflare, since this is one of the providers supported by Caddy (filter by caddy-dns here to see others), downloaded a custom Caddy build, added a diversion (Debian/Ubuntu-specific) so that the regular package is in place (though I'll have to upgrade to new versions manually) and changed config to this:
{
    email alexander@solovyov.net
}

*.xxx.solovyov.net {
	encode zstd gzip
	reverse_proxy localhost:5900
	handle_errors {
		respond "Server: {http.error.status_code} {http.error.status_text}"
	}
	tls {
		dns cloudflare <API TOKEN HERE>
	}
	log {
		output file /var/log/caddy/d.log
	}
}
You can get Cloudflare API token here. And it worked! I got wildcard certificate so no need to edit this config any more!
/etc/hosts
This is optional, but if you want the same glorious setup, add this to /etc/hosts:
127.0.0.1 test.xxx.solovyov.net
but do not forget to use your actual DNS address. :)
Adding a new domain
There are a few edit points:
- Local
Caddyfile— this is non-optional to map name to port (again, I give different projects different ports so that I can start a few of them simultaneously) - Remote
Caddyfile— when there is no wildcard certificate /etc/hosts— optional, to short-circuit browser
In case something is not working, you will get different errors:
Server: ...if there is no connection from your server Caddy to laptop's Caddy. Maybe your ssh tunnel is down, if everything is in place,kill $(pgrep -f sshtun)helps to force reconnect.Local: ...if there is no connection from local Caddy to your process. Perhaps it's time to start your site? :)- Other stuff should come straight from your process, so you know what to do.
The End
And you know what? No need to start many ngrok processes occupying your terminal when you want a few of your sites running! Epic.